
This guide will show you how to make intarsia wood art. This information includes information about Wood types, patterns and tools as well as techniques. You can read on to learn about this amazing craft. You may want to experiment with different types of wood depending on your level of skill. If you're new to this craft, you can start by making a sample piece to get a feel for the process.
Patterns
Woodworkers who are skilled can make many intarsia projects including holiday, tree and flower ornaments. These intarsia patterns are for all skill levels. They also showcase the beauty of the process. 21 full-size Intarsia Patterns are included. There is also helpful information regarding shaping, wood and blades.
Intarsia, which uses contrasting wood species to create furniture and wall hangings, is a fun and unique way to make a piece of furniture. It is similar to making a puzzle out of different pieces. The wood is then stained or polished and each piece is then assembled to give the project depth and character. Making intarsia-wood patterns can be quite difficult. It is worth looking for free intarsia patterns to help you make the right choices for your project.
Tools
You will need special tools to make the best intarsia. A small belt sander makes it easy to remove material quickly and smooth out edges. If you need a tool to shape or sand fine details, a dremel or flex shaft can be helpful. You will find different tools and blades for shaping small areas.
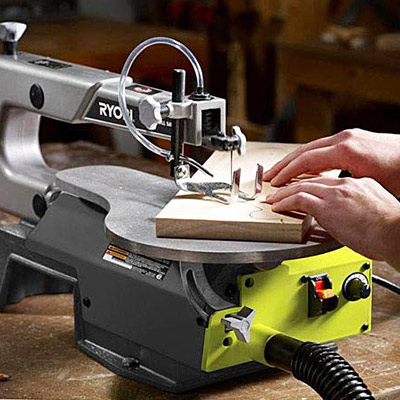
Jigsaw: Jigsaws can be used to cut wood but not in the same way as a scrollsaw. To smoothen wood surfaces, you will also need to use sanders. Two types of wood are required for intarsia woodworking. They must have different colors and grains. The wood can then get stained differently. Once the wood has been cut it will be sanded to make a mosaic-like design.
Techniques
You don't have to be a pro at intarsia. It is possible to create beautiful pieces of art if you know the right techniques. A pattern can serve as a starting point for artistic creativity. With these ideas, you'll be well on your way to creating a stunning piece of intarsia wood art. These are some examples of techniques:
First, select the project design. Keep extra copies of your template. Next, pick the wood species you will use. Different species of wood can have unique characteristics. Your project will have a deeper and more interesting dimension if you rough out the thickness of each wood piece. You can add pieces to your project with glue by adding layers of wood. Finalize your project by removing all backing and leaving the finished intarsia.
Woods to use
The new book provides the tools and techniques you need to make unique inlaid pieces. Kathy's progressive teaching style will help you learn everything, from the basics to the subtleties of color breaks. You'll be referring to this book even if you have never made intarsia before.
First, make sure you choose woods with the same grain orientation and that complement each others. To make a teddy, 20 pieces of wood must be made from four different kinds of wood. Each grain has a slightly different texture. This means you'll need a saw with a high-speed blade. Once you've figured out the wood's color and grain orientation, you're ready to move on to cutting and staining.
Colors

The colors of intarsia wood are as varied as the pieces themselves. Heartwoods are reddish brown or gray black, while saps are white. Cherry, for example, is one of the woods that will darken over time. Cherry starts with a light color and becomes a medium-toned wood when exposed to sunlight. Cedar and other woods have different tones. This creates depth for your project.
Intarsia refers to a type art made by joining different pieces of wood together and creating patterns. It originated in the Islamic world, but today is often associated with Italy. To create a three-dimensional effect, woodworkers use a variety of wood shades with different thicknesses. Colors of intarsia are often found on jewelry boxes, wooden chests, and keepake boxes.
This is a slow process
Intarsia requires a variety of staining and wood types. To create beautiful intarsia patterns, artists must collect different types of wood and stains. While plywood and birch are the most common woods to use, there are many other options. The type of wood that an artist chooses is entirely dependent on his or her personal preference. Intarsia projects are often created by craftsmen who prefer Western Red Cedar.
Intarsia woodworking begins with the cutting and labeling of inlay pieces. The artist then glues the pieces together. The glue is dried and the woodworker finishes it with a double bevel-inlay. This is a time-consuming task that requires great skill. The finished product is truly a work in art.
FAQ
What's the time taken to finish a piece furniture?
It depends on the size of the piece of furniture. You can finish smaller projects, such as boxes or picture frames, in one day. Larger projects, such as desks and dining tables, can take several days. It takes time in order to properly stain or seal the wood.
Which wooden items are very popular?
These wooden products are the most popular. They were made from sustainably harvested wood.
The most used wood types for furniture are oak, maple and walnut.
These woods are extremely strong but also have beautiful colors and grain patterns. They also last for many years if cared for properly.
To prevent moisture damage to wood furniture, it is important that it be painted before any other surfaces. All surfaces should be painted, including doors, drawers, and handles.
Choose a paint with water resistance if you want furniture to last as long possible.
Followed by two coats, you should apply a quality oil-based primer. Depending on the amount of wear, you may need several coats.
Avoid spray cans or aerosol colors. These products can evaporate quickly and emit harmful fumes.
Can I make my living doing this job?
Yes! Many woodworkers have this ability. According to the U.S. Bureau of Labor Statistics, the median annual woodworker wage was $34,000 in May 2012. This is significantly higher than the national average, which is $31,000 per year.
Statistics
- If your lumber isn't as dry as you would like when you purchase it (over 22% in Glen Huey's opinion…probably over 10-15% in my opinion), then it's a good idea to let it acclimate to your workshop for a couple of weeks. (woodandshop.com)
- The best-paid 10 percent make $76,000, while the lowest-paid 10 percent make $34,000. (zippia.com)
- Overall employment of woodworkers is projected to grow 8 percent from 2020 to 2030, about as fast as the average for all occupations. (bls.gov)
- Woodworkers on the lower end of that spectrum, the bottom 10% to be exact, make roughly $24,000 a year, while the top 10% makes $108,000. (zippia.com)
External Links
How To
How to stain wood
Staining wood can be described as a process where chemicals are applied to the wood surface. This causes the wood to take on a new color. The wood will turn from white to brownish-red due to the chemical reaction. Oak is the most commonly used wood for staining, but other woods can also be stained.
There are many methods to apply stain to wood surfaces. Some methods involve mixing the stain with a solvent (such as turpentine) and then brushing or spraying the mixture onto the wood. You can also apply a solution containing water and dye directly to the wooden surface. You can also mix stains with varnishes or paints so that they become part the finish coating.
Preparing the wood surface is the first step to staining it. The wood must be thoroughly cleaned to remove all grease and dirt. Sanding can smoothen out scratches and uneven spots. Next, you need to decide which stain you want. There are two basic kinds of stains: penetrating stains and non-penetrating stains. Penetrating and non-penetrating wood stains penetrate deeper than other types, making them perfect for dark colors like mahogany. Non-penetrating stains work best with light colors like maple.
After deciding on the type of stain, you want to apply, prepare your tools. Paintbrushes are great for applying stain because they allow you to evenly spread the liquid across the surface. You should also have some handy rags to wipe up excess stains after you finish painting. If you plan to mix the stain yourself, make sure you have enough containers available to hold the different components of the mixture.
Once you have prepared all your materials, it is time to clean the areas where you will stain the wood. Use soap and warm water to remove dust and grime. You can wipe down the entire furniture using a damp rag with clean water. Make sure you eliminate any loose debris, especially if you plan to stain darker wood.
Apply the stain next. Begin at one end and spray or brush the stain on the wood. Move slowly and carefully along the grain of your wood until you reach its opposite end. Be careful not to let the stain drip off the wood's edge. Before proceeding to the next step, let the stain dry thoroughly.
A coat of clear polyurethane sealing agent is applied to protect the paint. Three coats of polyurethane sealing agent are required. Allow the third coat to dry overnight, before sanding.