
A lidded box is a faceplate project that requires you to square the sides and perimeter of the box. Both the lid and box are made from the same 2-in thick, seasoned block. To square the base, first cut a half inch on each side. As the final box will be placed on the base, it is necessary to make the center slightly recessive. You can use a small scraper or a knife to make the recess.
Challenges of hollowing end grain in lidded boxes
The hollowing of end grain is a common challenge when box-making. This process is difficult and involves specialist tools. A simple hollowing tool can be made for $30 using an old screwdriver. Another option is to buy a tool called a "gouge" and use it as a hollowing tool. The key to hollowing end grain is to avoid using sharp edges. A gouge should have an oval shape fingernail and a long flat bevel.
The hardest part about hollowing end grain is the fact that it is five-times more difficult than side grain. It can also be prone to tearing out. This is one of the reasons why experienced bowl turners often experience problems when hollowing end grain. You can overcome these problems by switching to a scraper or a gouge. However, it is worth noting the special end grain tools that are required for lidded boxes.
Techniques for making a snap-fit lidded box
A snap-fit lidded boxes is a container with a sliding seal. These boxes can contain liquids or other liquid-filled items. They are easy to assemble and disassemble, and can be automated for low assembly costs. There are many snap-fits, so engineers need to choose the most cost-effective, strong, and reliable. Below is a list of different types of snapfits.
It is crucial to make sure the upper portion of the snap-fit lidded container you are using a 3-D printer has the right measurements. The base should not be able to squeeze the upper part. The lid should remain in place. A proper snap fit should be evident in the lid's fit. This can be achieved by removing wood in small steps. This is a difficult process, but it is well worth it.
Wooden used to make lidded boxes
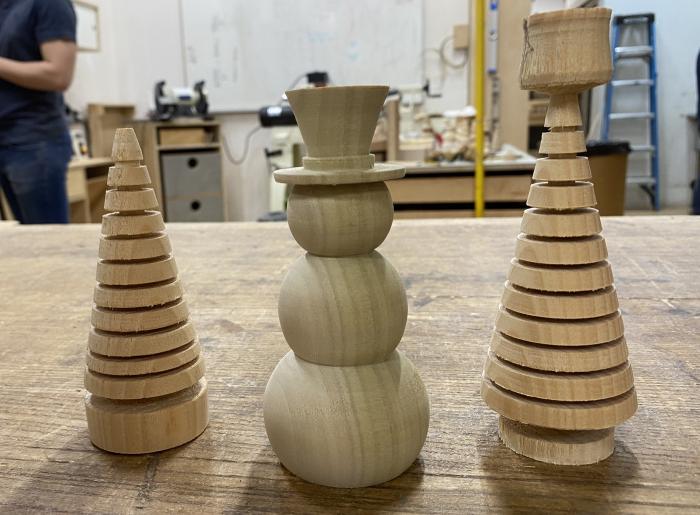
Reclaimed wood is used to make lidded containers. After a tree has been harvested, it is dried to prevent cracks. The wood is then rough turned to create a general shape. The wood undergoes another drying process, which makes it shrink. The lidded wooden box can be made out of various wood types depending on its style. Generally, a lid is made of two pieces - one is smaller than the other.
Small circular containers with lids were made by turning them on a lathe. Boxwood is a slow-growing wood with fine parts and a close grain. Because the grain was so close together, this wood was especially useful for creating fine features. It was commonly used to make double sided combs. Boxwood was also used to make lid boxes, also known as pyxides.
The size of the lidded container
The type of wood that you use determines the size of the lidded container. Maple and cherries are the most popular woods. These two wood types make great boxes because they have different shrinkage rates. For a good quality box, the wood should be 3 inches squared and 5-6 inches long. When choosing the wood for your box, make sure it is dry throughout. For an aesthetically pleasing lid, you can use exotic woods, but you should be familiar with the process.
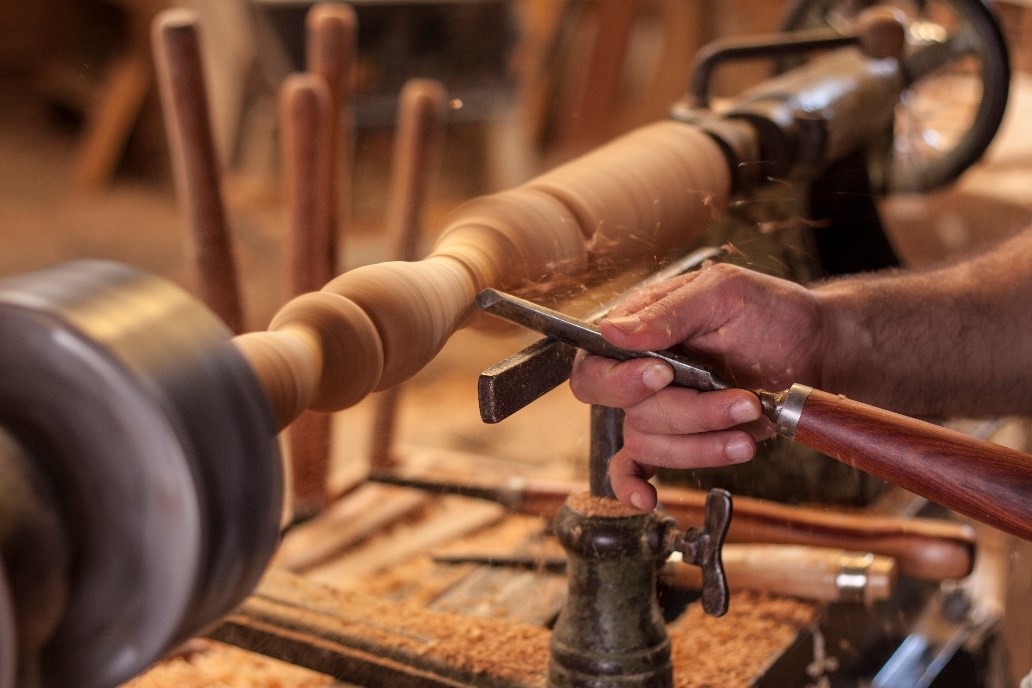
First, prepare the wood. You will need a thin chamfer to smoothen the bottom of your box and make it round. After that, cut a V-shaped cut at the joint. Once you're happy with the shape, you can use a spindle-roughing gouge to finish shaping the rest of the box. Before carving the lid, make sure to use a parting device to mark the bottom. Then, you can use a skew-chisel or a pencil to create a small chamfer at the base of your lid. This will soften and conceal the slight circularity at your base/lid junction.
FAQ
What is the difference between plywood and particle board?
Plywood is a combination of layers of wood, which are then pressed together under high pressure. Plywood can be cut to different thicknesses. It's commonly used as flooring and cabinets. Particle board consists of sawdust mixed and resin. The resin is then compressed into large blocks. This board is commonly used in home improvement projects. Both types are sturdy and easy to cut.
How do I learn basic woodworking skills?
A great way to start learning how to build furniture is by building a simple bench for yourself. You can do this project using any type of wood you have on hand at home. You don't need to know which type of wood you should use. Instead, get some pine boards at Lowes or Home Depot. Once you have built your bench, you will need to sand it off and then finish it with a stain/varnish.
How do I determine what kind of wood my project is made from?
Always verify the label on wood purchases. It should have information about the wood species as well its moisture content and whether any preservatives were used.
Where can I find my woodworking tools?
There are many places you can get everything you need, and you don't have to go far. You could go to your local hardware shop or visit websites such as Amazon.com.
You can also check garage sales and flea markets for old furniture and other materials you can reuse.
How can a novice woodworker make it big?
Many people learn how to make furniture in order to set up an online business. There are other ways to make money if you're just starting out building furniture than selling on Etsy. Local craft fairs and events are great places to sell your products. You could also offer workshops to help others learn how to make their own furniture. Consider offering your services if you have previous experience as a builder or carpenter.
Statistics
- Woodworkers on the lower end of that spectrum, the bottom 10% to be exact, make roughly $24,000 a year, while the top 10% makes $108,000. (zippia.com)
- Overall employment of woodworkers is projected to grow 8 percent from 2020 to 2030, about as fast as the average for all occupations. (bls.gov)
- In 2014, there were just over 237,000 jobs for all woodworkers, with other wood product manufacturing employing 23 percent; wood kitchen cabinets and countertop manufacturing employing 21 percent. (theartcareerproject.com)
- The U.S. Bureau of Labor Statistics (BLS) estimates that the number of jobs for woodworkers will decline by 4% between 2019 and 2029. (indeed.com)
External Links
How To
Tips for driving a nail in wood
To drive a nail into wood, the first step is to select the right size and type hammer. Claw hammers include mallets, claw hammers (sledgehammers), mallets, ball-peen hammers, hatchets, and mallets. Each type of hammer comes with its advantages and disadvantages. A claw hammer is best for hitting nails or hard objects. However, it can be difficult to pinpoint exactly where the blow will land. A sledgehammer is useful for striking large areas at once but too heavy to be effective for smaller tasks.
Place your hand flat on the side of your chosen hammer so that the handle rests in your palm. Grab the handle tightly, but do not squeeze too hard. You should hold the hammer straight-up, with your wrist still relaxed. Swing the hammer back towards the ground, with your aim at the middle of the nail. You should feel the impact from the hammer striking a nail. If you're having trouble getting the hang of swinging a hammer, practice with a block of wood until you get the rhythm down.
Once you are ready to drive the nail, place the hammer close to your body. Place the nail so that it is perpendicular with the wood's surface. Your eyes should be focused on the nail's tip. Swing the hammer forward, and then move the hammerhead. This can be repeated several times to increase the speed of your swing. After mastering the technique, you can add power to your swings. Try holding the hammer above your shoulder and bring it down forcefully. This will allow you to exert more energy.
Once you have successfully drilled the first hole in the nail, remove the hammer. Use a pry bar or screwdriver to pull out the rest of the nails. To avoid splitting the wood, make sure the nail heads are not touching the board's surface.