This article will discuss the inlay techniques, the materials used, as well as how to install and maintain it. With a rotary handpiece and 1/16" upcut spiral bits, we'll learn how to make mortise and inlay. Learn more. Then, try it yourself! This is a simple, rewarding project that you will enjoy. Inlay is a must for any woodturning project!
Techniques
Inlay techniques may be an essential part of any woodworking project. They can add beauty and interest to the final piece. There are several ways to create a beautiful inlay, each of which has its own advantages. This article will help you understand the differences. Learn more. You will need to prepare the wood. Use a paper towel or damp rag to clean the wood. You may want to apply some mild dish soap to remove dirt and other residue. It is important to be careful when you use chemicals because they can damage the wooden. You might also consider hand tools for removing wood.
Inlay techniques can be applied to other materials. You can inlay metal, wood, or stone as an example. Inlaid pieces are a great way to create contrasting images when used correctly. You can use a variety of inlay tools to secure the inlayed items in place, including jigs, knives and fixtures. Inlaying can either be done after or before turning the wood. You can inlay materials on the top or bottom of the piece after you have turned it.
Materials
You can give your piece more visual appeal by using a variety of inlay materials. Inlay materials can be used to cover many types of recesses, including those created by the lathe, natural cracks, and voids in wood. Inlay materials may also be used for covering screw heads or brad nail positions. These are the steps to create beautiful inlays.
The first step in making an inlay design is to choose the material. There are some materials that are more suitable for this purpose than others. Some people may be more comfortable with resin inlay because it doesn't require cutting delicate pieces, and it also fills in voids after mortises are created. Additionally, resin is available in many colors, which can be magical at times. These are some helpful tips for using resin as an inlay.
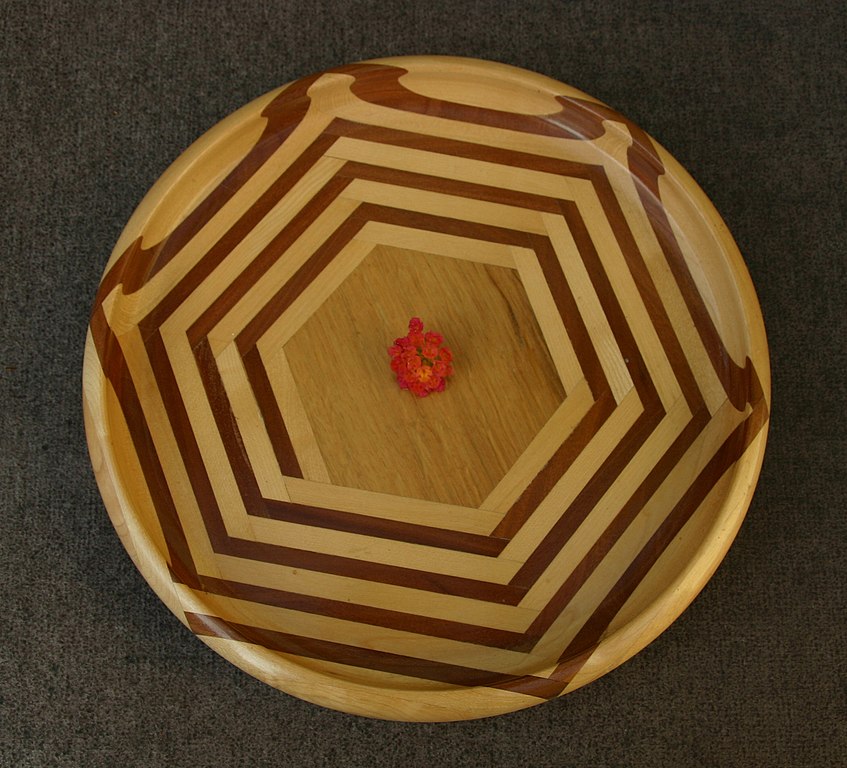
Installation

Inlay work is a decorative technique that can be used to turn wooden objects. Woodturners can learn how to install woodturning inlays by following Ron Hampton's detailed instructions. He walks you through the installation of inlays on bottoms, tops and bowls. He also discusses safety and precision. This technique adds a unique touch to the wood turnings. Woodcraft has a wide selection of inlay bandings.
Before installing woodturning, you must prepare the base of your piece of wood. The best way to achieve the best results is to use a plunger router. Attach the template guide to your router's base. Place the bushing around the guide collar. After placing the inlay, make sure the base is flat. It will be easier for you to install the inlay because of its angled edges. It will be easier to install the inlay if your router has a bit slightly larger than the mortise.
Maintenance
Woodturning inlay requires only a few simple steps. Before putting your inlay in your woodturning project, you need to clean it thoroughly. This is especially important if you use CA glue for stones inlay. A 3/16" allen wrench can be used to measure the inlay's depth if you have limited space. Use 120 grit sandpaper to protect your inlay.
FAQ
Where can you find free woodworking blueprints?
To find free woodworking plans, you don't have to buy any magazines or books. All you need to do is search Google. You can search Google for "free woodworking" and hundreds of websites will appear allowing you to download plans.
What is the minimum amount I will need to start?
Because each project is unique there are no exact numbers. These are the factors that will give you an idea of how much you'll need.
-
Material costs
-
Tools and equipment
-
Time spent on the Project
-
Hourly rate
-
What profit are you expecting to earn?
-
Whether you plan to hire help
It's a good idea for beginners to start with small projects like frames and boxes. As you gain experience, more difficult projects will become possible.
Where can I buy woodworking supplies?
You can find everything you need in many places. You could also visit hardware stores in your area or shop online at Amazon.com.
You can also search flea and garage sales for furniture and other materials that can be reused.
How can I organize my shop?
First, make sure you have a designated space for tools storage. Your tools will stay sharp and ready to go when they are free from dust and debris. To hang accessories and tools, use pegboard hooks.
How long does it take to finish a piece of furniture?
It depends on the type and complexity of your design as well as the amount of finishing that you use. Hardwoods require more care than softwoods. Hardwoods are more expensive than other woods. But they last longer and resist moisture better. The process of finishing a piece of furniture typically takes anywhere from one week to three months.
How do I get started as a woodworker?
Woodworking requires patience and practice. It takes time and practice to master the various techniques and tools required for woodworking.
There are many options for woodworking equipment today. Some people prefer using power tools while others prefer hand tools.
The choice is yours, but you must ensure you choose the right tool for the job. It may be a good idea to start with a basic set, if possible, if you don’t know much about hand tools.
You might also want to learn how a router works, which allows you to cut wood into intricate shapes. You can find these at most hardware stores.
How do I identify the type of wood that I am dealing with?
Always check the label before purchasing wood. The label should include information about the wood species and its moisture content as well as whether or not it has been treated using preservatives.
Statistics
- Woodworkers on the lower end of that spectrum, the bottom 10% to be exact, make roughly $24,000 a year, while the top 10% makes $108,000. (zippia.com)
- The best-paid 10 percent make $76,000, while the lowest-paid 10 percent make $34,000. (zippia.com)
- If your lumber isn't as dry as you would like when you purchase it (over 22% in Glen Huey's opinion…probably over 10-15% in my opinion), then it's a good idea to let it acclimate to your workshop for a couple of weeks. (woodandshop.com)
- Most woodworkers agree that lumber moisture needs to be under 10% for building furniture. (woodandshop.com)
External Links
How To
How to properly use a handsaw
Hand saws are used to cut the wood into pieces. There are many types of handsaws: jigsaws and table saws; band saws; sabersaws; crosscut saws; miter saws; and rip-saws. A hand saw is made from metal or plastic and cuts materials such as wood, plastics and metals.
Hand saws have the main advantage of cutting at precise angles without needing to adjust the blade. It's also much easier to sharpen them than power tools. There are also some drawbacks. For example, they are heavy and bulky, so you must be careful when transporting them. Additionally, if they are unfamiliar, it is possible to injure oneself.
There are many ways that you can use a handsaw. When cutting, you should keep your hands away from the blades. If you don't, you might get hurt. When holding the saw, you should place your fingers around the handle, keeping your thumb up near the top of the blade. This way, you won't accidentally touch the blade.
It is important to not put anything under the piece you are cutting when using a handheld saw. This would result in the blade slipping off the wood's surface. Before you begin cutting, make sure to inspect the area. Check for nails, screws and other objects underneath the wood.
When working with a handheld saw, safety goggles are essential. They prevent dust from getting into your eyes, making it easier to see what you're doing. Safety glasses are also useful because they protect your face from flying debris.
Before you start working with a saw, it is important to learn how to use it safely. Practice until you feel comfortable cutting. Once you are comfortable with the basics, you will be able cut almost any material.