
If you need to cut tight curves, your band saw blade is just as important as the model it came with. The less expensive models will usually have a cheaper blade. Professionals have many blades. However, DIYers only tend to have one or two. There are several factors to consider when selecting the best band saw blade for tight curves. The type of cut you are making should dictate the blade's width. A narrow blade is best for delicate work. A 3/4-inch blade is best for straight cuts.
Variable Pitch
You may wonder if a Variable Pitch blade band saw blade is the right tool for you if you are working on a tight curve. You may be wondering how to choose the right blade. This blade can easily cut through closed openings or tight curves. First, make some relief cut around the curve to give the blade room to turn. Remove the first piece of debris to clear the path.
The main advantage of this band saw blade is its high-quality teeth. The band saw's teeth can withstand multiple forces while cutting through two walls made from tube steel. As the saw advances forward, it releases the tooth by the downward feed force. Thicker chips, however, can stick to teeth and ruin the cut quality. The groove geometry allows for proper coolant flow, which helps flush out any chips stuck to the teeth.
Regular-tooth
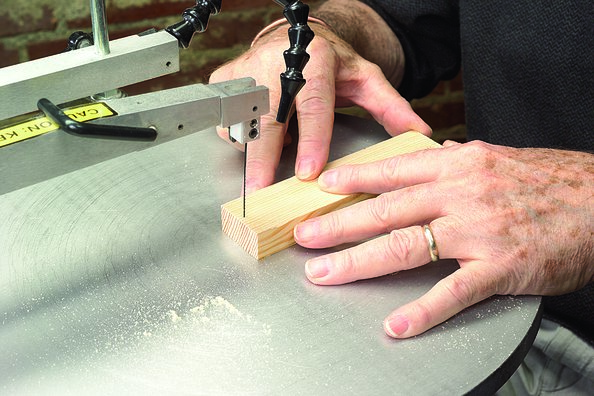
It is best to use a wider blade when cutting curves. The radius of the cut depends on the blade width. A narrower blade's width is best for cutting tight curves. Larger blades are good for resawing, as well as for making near-straight cuts. Use the chart below to determine the proper blade width for a given job. This chart provides guidelines to help you choose the right blade width.

A regular-tooth blade band saw blade will work well for tight curve cutting. However, it will need to be used at higher temperatures. This means you will need more force to cut a specific part. The blade may also tend to move in one direction during cutting, increasing the risk of smoke and burns. To prevent this, you can place a thin layer of beeswax on the blade.
0deg. rake angle
To achieve the best results when cutting tight curves, use the 0deg. A band saw blade's rake angle should be set for best results. This angle ensures a clean, straight cutting edge. The rake angle is not directly measured, but an appropriate value can be approximated using a force gauge that acts in a direction at right angles to the cutting edge. Additionally, the cutting ratio values can be measured empirically, either directly or indirectly.
For the ideal rake angle, you need to compare the radius of your cut and the size of your kerf. Keep in mind that band saw blades have different kerf sizes. To choose the best one for the job, make sure you know what your material is made of. You can use a scrap piece of wood to test the rake angle of the band saw blade.
Wood Slicer
Band saws are versatile tools that can easily cut narrow curves and open spaces. Make a few relief cuts on your workpiece to make it easier. These cutouts allow the blade to turn more freely. You should also make sure that you remove any waste from each cut. This will give it more room for turning. After you have completed the workpiece, turn off the blade.
For most of the curves and small inside cuts, a 1/4-inch blade is the right choice. A 1/4 inch blade will allow for tight inside cuts that won't cause the blade to drift. You will need to make intersecting cut first in order to get a more accurate cut. To avoid binding on tight curves, make sure you adjust your saw's depth gauge. Another option is to use a larger saw blade with a smaller radius.
Freshcut 37
The Freshcut 37 bandsaw blade will allow you to cut tight curves on your bandsaw. The blade has a relief cut which allows it to finish the curve and move on to the next steps. The blade wraps around the cut and leaves small pieces of waste for easy turning. Before you begin cutting curves, make sure that you always back out any cuts. This will prevent the saw's twisting during the next cutting.
If you plan to cut many tight curves on your bandsaw, you should consider purchasing a variable pitch band saw blade. This blade is designed to cut a wider variety of materials, such as wood, metal, and plastic. Its variable pitch makes it versatile enough to be used in a variety of applications. It can also be used to cut metal (including plastic and metal) and composites. This bandsaw blade is made out of heat-treated steel, which provides extra durability.
FAQ
What kind of wood should you use?
Woodworking is a popular job that involves oak, pine and maple. Each wood type has its own characteristics which affect the final product's appearance and feel. Oak is a darker wood and tends to be more durable than other types. Birch is light and soft, while mahogany can be heavier and more dense. You can also pick between veneers and solid wood. Veneers are thin wood sheets that are glued together to form one layer.
Is it necessary to be a genius in woodworking to succeed?
No. Woodworking is not rocket science. To create stunning works of art, anyone can learn to use basic power tools.
How often should I purchase new supplies?
You may have to replace certain tools. You'll need to sharpen your hand tools regularly if you use them. If you are using power tools, you will need to purchase replacement parts regularly. Avoid buying too many products at once. Spread your purchases out over several months.
What type of tools does a carpenter use?
Carpenters most often use a tool called a hammer. A hammer helps to carpenter pound nails into the wood. A hammer is used to hold pieces together during a project. Other tools include clamps and pliers, screwdrivers as well as measuring tape, pencils and saws.
Do you have any suggestions for starting a woodworking shop?
It's not easy to start your own woodworking business. But if you're passionate about your hobby, you won't mind putting in the effort. You will probably love the challenge of starting your own business.
One thing to keep in mind when launching a new venture is that you might encounter unexpected problems along the way. For instance, you might run out of money unexpectedly. Maybe customers won't be willing to pay what you want. Preparedness is key to survival in such situations.
One good tip is to set up a separate bank account specifically for your business. You'll be able to track how much money comes in and out.
How can a beginning woodworker make a living?
Many people want to open an online furniture business and are learning how to build it. However, if you're just getting into furniture building, there are other options than selling on Etsy. You could sell at craft fairs or local events. For those who want to build their own furniture, you might offer workshops. You might be able to offer services like remodeling homes or making custom pieces for clients if you are a skilled carpenter.
Where can I locate free woodworking plans
For free woodworking blueprints, you don’t need to read any magazines or buy any books. You just need to search Google. Enter "free woodworking", and you will see hundreds upon hundreds of websites offering free plans.
Statistics
- In 2014, there were just over 237,000 jobs for all woodworkers, with other wood product manufacturing employing 23 percent; wood kitchen cabinets and countertop manufacturing employing 21 percent. (theartcareerproject.com)
- The U.S. Bureau of Labor Statistics (BLS) estimates that the number of jobs for woodworkers will decline by 4% between 2019 and 2029. (indeed.com)
- If your lumber isn't as dry as you would like when you purchase it (over 22% in Glen Huey's opinion…probably over 10-15% in my opinion), then it's a good idea to let it acclimate to your workshop for a couple of weeks. (woodandshop.com)
- Woodworkers on the lower end of that spectrum, the bottom 10% to be exact, make roughly $24,000 a year, while the top 10% makes $108,000. (zippia.com)
External Links
How To
How to make wood joints
This tutorial will demonstrate how to join two pieces together of wood. We'll use the "pocket hole joint," which means we drill holes in the wood and then glue them together. If your wood has a straight grain, smooth surface, you can use this method. You might consider dowel joinery if your wood isn’t straight or flat. Here are the steps
-
Drill Pocket Hole Joints. Start by measuring and marking the spot where the pocket hole joint will be placed. Use a jigsaw or handheld drilling machine to drill 3/8 inch deep holes at the ends of each wood piece.
-
Sand Smooth. The wood's edges can be sanded to prevent splitting.
-
Glue Together Apply glue to the sides of both wood. Allow it to sit for approximately 5 minutes before you clamp the pieces together.
-
Clamp the Pieces Together. After the glue has dried properly, clamp the pieces together to make sure they are flush.
-
Trim Joinery. After the glue dries, trim any excess wood around your joint.
Make sure to leave enough room between the pieces so that you can turn them inside and out.